Quantitative
Fluorescence Microscopy of Nuclear DNA Content in Cells of the Fission Yeast,
Schizosaccharomyces pombe
Here's an example of what can be done with this technique:
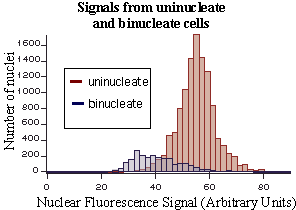
These frequency histograms show the distribution of Sytox Green fluorescence
in thousands of individual nuclei within log phase, wild type (strain 501)
S. pombe cells, growing in rich medium. Notice that a 1N (G1 phase)
subpopulation can be resolved in the binucleate population. Most or all
of the remaining binucleate cells appear to be in S phase.
Protocols and Macros
Version 1; October 31, 1999
Note: aside from the picture above, this early version
does not contain illustrations. An enhanced version with numerous clarifying
illustrations is planned within the next month.
These procedures are the results of the combined efforts
of:
Marius Poitelea
Amy Piwowar
Joel A. Huberman
For further information, contact:
Dr. Joel A. Huberman
Department of Genetics
Roswell Park Cancer Institute
Elm & Carlton Streets
Buffalo, NY 14263
e-mail:
joel.huberman@roswellpark.org
huberman@acsu.buffalo.edu
Web:
http://mcbio.med.buffalo.edu/CMB/huberman/jh.html
Table of Contents
Introduction
Acknowledgements
How to get in touch
Preparation of S. pombe Cells for
Quantitative Microscopic Measurements of Nuclear DNA Content
General notes on the use of an epifluorescence
microscope with cooled CCD camera for quantitative fluorescence microscopy
Detailed Procedures for Fluorescence
and Bright Field Microscopy for Quantitative Analysis of Nuclear Fluorescence
Image Processing
Text of the macros for image processing
Introduction
Using conventional FACS analysis, it is frequently difficult to follow
the progress of haploid fission yeast cells through the cell cycle. Under
most laboratory conditions, both G1 and S phases are short, G2 is long,
and cytokinesis takes place near the end of S phase. The result is that
FACS analysis scores G1 phase cells as 2N (because there are two 1N nuclei
in a single cell), indistinguishable from G2 cells. S phase cells form shoulders
to the left and right of the 2N peak, depending on whether cytokinesis has
(left shoulder) or has not (right shoulder) taken place.
Due to these limitations of FACS, we recently found that we couldn't
answer two simple questions about the fission yeast cell cycle that we needed
to answer in order to permit our research on replication timing and replication
checkpoints in fission yeast to move forward. The first question was: how
synchronously do cells blocked in and released from G2 (cdc25 block
and release) pass through the subsequent S phase? The second question was:
do mutations in checkpoint genes (such as rad3 and cds1) affect
the lengths of the different phases of the cell cycle even in the absence
of DNA damage or replication abnormalities?
To answer these and similar questions, we developed the procedures described
here. We reasoned that the problem with FACS is that it cannot measure the
DNA content within the individual nuclei in binucleate cells and cannot
distinguish binucleate cells from uninucleate ones. We suspected that we
might be able to use DNA-specific fluorescent dyes to measure nuclear DNA
contents, as in FACS, but instead of using a photocell to measure the fluorescence
signal, we would use a fluorescence microscope and cooled CCD camera. This
would allow us to measure the DNA contents of individual nuclei within binucleate
cells. We also suspected that we could use automated image analysis procedures
to distinguish uninucleate from binucleate cells.
After considerable effort, we appear to have succeeded. This manuscript
describes the procedures that we developed and provides suggestions for
their use.
This is a long document. That is because what we are describing are new
procedures, rather different from those with which most fission yeast biologists
are familiar. We wanted to make these new procedures as clear as possible
and to provide as many hints as possible. Hence the length of the document.
Actually carrying out these procedures is, in fact, rather simple once one
has become accustomed to them. Much of the cell preparation work is similar
to the preparations that would be used for FACS analysis. Although the microscopy
and image analysis procedures require more time than FACS analysis, they
have the advantage of yielding information in situations that FACS is powerless
to deal with.
We hope that these procedures will be useful to the S. pombe community.
We note that, with minor modification, the procedures we've developed could
also be used to automate determining the frequencies of the "cut"
phenotype (see step 59 under "Image Processing") or of septated
cells.
Acknowledgements
We are especially grateful to John Yates for letting us use his microscope
and CCD camera, and to Jackie Bashaw, in John's lab, for giving us initial
instruction in the use of the microscope.
Thanks are due to Susan Forsburg for pioneering the use of Sytox Green
for determination of S. pombe nuclear DNA content (by FACS).
We also thank the other members of our lab--Soo-Mi Kim, Maria Marchetti,
Karuna Sharma and Donna Scott--for their suggestions and for their patience
during the times when it seemed that we were wasting our time with this
project.
Research in the Huberman laboratory is supported by a grant (GM49294)
from the National Institutes of Health.
How to get in touch
If you have any questions, comments or suggestions, please let us know!
Since Marius Poitelea and Amy Piwowar were/are temporary trainees in the
lab, it is best to get in touch with Joel Huberman, and the easiest way
to contact him is by e-mail. He has two addresses, both of which should
work: huberman@sc3101.med.buffalo.edu
and huberman@acsu.buffalo.edu.
His telephone is (716) 845-3047. Also, the most current version of this
information will always be available from Joel's Web site: http://mcbio.med.buffalo.edu/CMB/huberman/jh.html.
Preparation of S. pombe Cells for
Quantitative Microscopic Measurements of Nuclear DNA Content
We use Sytox Green (SG) rather than DAPI or propidium iodide (PI) for
quantitative fluorescence microscopy. Why? We tested all three and found
SG to be best for the following reasons:
1) SG and PI produce brighter fluorescence than DAPI (by eye).
2) The CCD that we used (this may be true of all of them) is much less
sensitive to the bluish fluorescence produced by DAPI than to the green
and red produced by SG and PI.
3) Thus SG and PI yield much better signal to noise ratios than does
DAPI.
4) For reasons which aren't clear to us, SG produced a unimodal distribution
of fluorescence per nucleus for uniformly 2N nuclei, but PI produced a bimodal
distribution, with about 20% of the nuclei fluorescing distinctly more brightly
than the majority. We concluded that SG is less susceptible than PI to artifactual
distortions of nuclear fluorescence.
The following protocol is geared to generate final microscope slides
with fields containing 500 to 1000 S. pombe cells in a single camera
field when using a 20X objective lens. Such a field is roughly 0.4 x 0.5
mm (0.2 square mm), so there are about 1,500 such fields under an 18 mm
x 18 mm cover glass.
These considerations suggest that about 1 x 10⁶ cells are needed per
slide. However, 1 x 10⁶ cells form too small a pellet and would easily be
lost during the centrifugations and resuspensions required for cell preparation.
For that reason, this protocol is based on a sample size of 2.5 x 10⁷ cells,
which should be sufficient to prevent significant loss if one is careful
during cell preparation. Use of larger sample sizes is encouraged. Increase
the volumes recommended here in proportion to the increase in sample size.
1) Fixation in 70% ethanol
a) From the culture of S. pombe cells to be analyzed, take a sample
of sufficient volume to contain 2.5 x 10⁷ cells. The necessary volume will
depend on the cell concentration.
b) Centrifuge the sample sufficiently long and at sufficient speed to
pellet the cells. The precise centrifugation conditions will depend on the
volume used and the centrifugation equipment available.
c) Resuspend the cell pellet in a convenient volume of water, which should
be at least 1 ml, but may be larger if necessary to completely collect the
cells.
d) Again harvest the cells by centrifugation. Again resuspend in 1 ml
water.
e) Again harvest the cells by centrifugation (1 minute at full speed
in a microfuge is sufficient). This time resuspend in 1 ml of 70% ethanol.
The cells in 70% ethanol can be stored indefinitely in the refrigerator.
Note: The above procedure has the beneficial effect of removing
the growth medium before ethanol fixation. Removal of the medium is beneficial,
because in some cases medium components may be precipitated by ethanol.
Such precipitates can contribute to background during microscopy. In some
cases, however, one may wish to take samples quickly and not spend time
centrifuging and washing. In such cases, cells can be diluted directly into
ethanol (the final ethanol concentration should be 70%). This will quickly
fix and stabilize the cells, permitting one to proceed immediately to other
aspects of the experiment. Later, when time permits, these cells can be
washed in 70% ethanol to remove residual medium and at least some of the
precipitated medium components (if any).
2) RNase treatment
a) Harvest the ethanol-fixed cells by centrifugation. Resuspend in 1
ml of 50 mM sodium citrate. The purpose of this and the subsequent 50 mM
sodium citrate washes is to rehydrate the cells.
b) Again harvest by centrifugation. Again resuspend in 1 ml of 50 mM
sodium citrate.
c) Again harvest by centrifugation. Again resuspend in 1 ml of 50 mM
sodium citrate.
d) Add 1 µl of RNase A stock solution (100 mg/ml) to give a final
concentration of 100 µg/ml.
e) Incubate at 37° for 1 hour.
f) Harvest by centrifugation.
3) Calcofluor staining
a) Resuspend cells in 300 µl 50 mM sodium citrate.
b) Add 5 µl of Calcofluor stock solution (1 mg/ml; fully solubilized).
i) Note: Calcofluor comes in two forms, the free di-acid (Sigma
F3543) and the disodium salt (Sigma F3397). The salt is very soluble; the
acid is not. If you have access only to the acid form, you can titrate
it to the soluble salt form as follows:
(1) Suspend 1 mg Calcofluor (acid form) in 1 ml water.
(2) Slowly add 2N NaOH, checking the pH by spotting on pH paper. After
about 16 µl have been added, the Calcofluor will go completely into
solution, and the pH will be about 9.
(3) The solubilized Calcofluor solution is stable in the refrigerator
for months at least.
c) Incubate at 37° for 15 minutes.
d) Harvest by centrifugation. Resuspend cells in 1 ml of 50 mM sodium
citrate.
e) Harvest by centrifugation. Resuspend cells in 33 µl of 50 mM
sodium citrate. These cells can be stored in the refrigerator for weeks,
and aliquots may be withdrawn for Sytox Green staining when desired.
4) Sytox Green staining
a) In a very small microfuge tube, mix 1 volume (in multiples of 3 µl)
of the evenly resuspended Calcofluor-stained cells with 2 volumes of Sytox
Green staining solution (37.5 µM Sytox Green, 1.5 mM p-phenylenediamine
[an antifade reagent], 75% glycerol). The final concentrations will be 25
µM Sytox Green, 1 mM p-phenylenediamine, 50% glycerol.
b) Mix thoroughly by gentle pipetting to make sure cells are evenly distributed.
c) Place 3 µl of stained cells in the center of a clean glass slide.
Cover with an 18 mm square cover glass. If other cover glass sizes are employed,
adjust the volume of stained cells accordingly. The idea is to have as thin
a layer of cells as possible spread between the cover glass and the slide.
d) After the liquid has spread uniformly under the cover glass, seal
the edges of the cover glass with clear fingernail polish.
e) Allow the slides to incubate in horizontal position (cover glass up)
overnight at room temperature. Always keep the slides horizontal so that
the cells will settle by gravity onto the glass slide.
f) The next day, the cells can be examined and photographed in the microscope,
taking care to keep the slides horizontal. Also avoid jarring the slides
by sudden motions.
g) Note: Successful quantitative measurement of nuclear Sytox
Green fluorescence requires that all cells be in the same focal plane, that
none of the cells overlap, and that all cells remain absolutely motionless
during digital photography. In theory these conditions would best be satisfied
when the liquid layer between cover glass and slide is about 1 cell thick.
The layer produced by 3 µl under an 18 mm square cover glass is about
10 µm, which is about two cells thick. Nevertheless, we have found
these conditions to be satisfactory. If you have problems with cell motion
or cells lying on top of one another, consider reducing the volume used
to 2 µl.
General notes on the use of an epifluorescence
microscope with cooled CCD camera for quantitative fluorescence microscopy
We have used a Nikon Optiphot 2 microscope with a Spot cooled CCD camera
(Diagnostic Instruments, Inc.), courtesy of our colleague, John Yates..
Any other combination of research grade microscope and cooled CCD camera
should also be satisfactory. Obviously, we cannot supply specific instructions
for all possible combinations. The following comments offer a general guide.
The user should test (by eye) the available fluorescence filters to find
the ones optimal for Calcofluor and Sytox Green fluorescence. We have found
that our filter originally intended for fluorescein (FITC) works well with
Sytox Green, and the UV filter that we previously used for DAPI also works
well with Calcofluor. Propidium iodide fluorescence can be selected with
a filter designed for Texas Red.
We recommend photography with a 20X flat-field objective. With such a
low-power lens, the depth of field is sufficient that satisfactory results
can be achieved if all the cells are in one plane (i.e., lying flat on the
surface of the slide). If cells are clumped so that some are lying on top
of others, errors will be introduced due to partial loss of signal from
out-of-focus nuclei.
Exposure conditions should be adjusted so that the signals for areas
outside of cells are very low, while the signals for 2N nuclei are strong
but not saturating. The 1N nuclei (in many of the binucleate cells) should
produce signals that, by eye, are noticeably weaker than those generated
by 2N nuclei.
The CCD camera can be either color or gray-scale. If a color camera is
used, then only one of the channels need be used at a time. The selected
channel should be one that contains a large portion of the signal. We use
the green channel for Sytox Green and Calcofluor and the red channel for
brightfield. Whatever channel is chosen, eventually it must be converted
to gray-scale for processing by NIH Image software.
The intensity of the fluorescence signal emanating from each nucleus
is a function of the intensity of the exciting illumination striking that
nucleus. Unfortunately, the exciting illumination is not uniform over the
entire field of view. In the accompanying protocols and computer macros,
we employ a quick-and-dirty solution to this problem of non-uniformity.
Our image-processing computer macros permit the user to define (by eyeball
estimate) a region of relative uniformity within the field of view and to
restrict the quantitative analysis to that region.
More accurate, though somewhat more cumbersome, solutions to this problem
are also available. We are grateful to Dr. Serge Garbay (Unité des
Virus Oncogenes, Institut Pasteur, Paris) for pointing this out to us. Dr.
Garbay writes:
I also see this and it's possible to correct a non-uniform illumination
of a microscopic field with the following shading correction function:
c(x,y) = M . (i(x,y)-d(x,y))/(s(x,y)-d(x,y))
c(x,y) : corrected image
i(x,y) : original image
d(x,y) : dark current image obtained with the camera shutter closed
exposure time for d(x,y) is the same as i(x,y)
s(x,y) : white image obtained by using a uranyl crystal
pixel values of s(x,y) are near the maximum value
M : mean value of s(x,y) - d(x,y)
I use this technique to process for example NIH3T3 fluorescence cells
with 10 or 20 magnification.
You can find more information in:
Fluorescence Microscopy of Living Cells in Culture
Part B Quantitative Fluorescence Microscopy
Imaging and Spectroscopy 1989
Landsing D. Taylor, Yu-Li Wang
or in other image processing books where they talk about shading correction
or image corrections.
Note that uranyl crystals (available from Zeiss and similar sources)
are large enough to fill the field of view, and they fluoresce in proportion
to the intensity of the exciting illumination. Thus the procedure recommended
by Dr. Garbay permits pixel-by-pixel correction of unevenness of illumination
intensity.
Detailed Procedures for Fluorescence
and Bright Field Microscopy for Quantitative Analysis of Nuclear Fluorescence
With our microscope/camera combination, we have found it useful to take
3 pictures of each field of cells: one to detect the Sytox Green fluorescence
of nuclei, a second picture to detect Calcofluor fluorescence in order to
distinguish between cells with septa and cells that have completed cytokinesis
but are still stuck together at their ends, and a third picture using bright
field illumination through the Sytox Green filter so that the outlines of
the cells can be directly correlated with the images of the nuclei detected
by Sytox Green. We cannot easily use the Calcofluor image to correlate cell
outlines with the Sytox Green nuclei, because detecting Calcofuor requires
a different filter than detecting Sytox Green. With our microscope, when
filters are changed, the resulting images are slightly displaced from each
other. Although slight, this displacement makes it difficult for our image
processing macros to determine which nuclei are associated with which cells.
Note that some Sytox Green fluorescence is passed through the UV filter.
Consequently, nuclei are visible within the Calcofluor-stained cells as
spots of brighter fluorescence.
For both fluorescence and bright field microscopy:
1) Make sure the microscope is properly aligned for both bright field
(Koehler conditions) and fluorescence illumination.
2) Choose fields to photograph in which all the cells are in a single
focal plane (the plane of cells lying on the surface of the slide).
3) The cells should be individually resolvable, not in clusters or clumps.
4) Using bright field illumination with the condenser iris diaphragm
closed as far as possible (for maximum contrast), check to make sure that
there are no out-of-focus signals that will produce background irregularities.
5) Using Sytox Green fluorescence illumination, check to make sure that
there are no non-cell sources of fluorescence.
6) If all these conditions are satisfied, then the field is satisfactory
for quantitative analysis.
Note: because focussing bright field pictures of cells is trickier
than focusing fluorescence pictures, it is recommended that the bright field
picture of a given field be taken (and approved) before the fluorescence
picture is taken. This will minimize the amount of time between taking the
bright field and fluorescence pictures, which in turn will minimize the
possibility of cell movement between the two pictures.
For bright field microscopy of cells:
1) Make sure that the Sytox Green filter set is in place, but the fluorescence
light source should be blocked. The bright field light source should be
turned on. The camera settings should be those appropriate for bright field
illumination.
2) Make sure the condenser is set for bright field illumination (as opposed
to phase contrast or other alternative).
3) Use a high quality flat-field 20X objective lens.
4) Focus on the cells.
5) While focused on the cells, recheck that the condenser is centered
and focused (Koehler illumination).
6) Re-focus on the cells. Open the condenser iris diaphragm fully. Focus
so that the cells appear dark against a lighter background. The contrast
will be poor.
7) Close the iris diaphragm part way (slide the control knob part way
to the right) until the cells appear somewhat darker than with the diaphragm
fully open. Do not close the diaphragm to the point that brighter
regions appear on the edges of the cells! The cell images should remain
dark. No lighter areas should appear inside the cells. If they do, refocus
and/or open the diaphragm somewhat.
8) When ready, take a picture.
9) If the cell picture does not show uniformly dark cells against a light
background, try focusing further away from the direction in which cells
turn bright. Continue experimenting until a picture with uniformly dark
cells is achieved. The image processing macros will not work properly unless
the cells are uniformly dark.
For Sytox Green fluorescence microscopy of nuclei:
1) Keep the Sytox Green filter in place. Turn off the bright field light
source and unblock the fluorescence light source.
2) Switch the camera exposure settings to those appropriate for Sytox
Green fluorescence.
3) Make sure the fluorescence light source and light path are adjusted
for centered illumination that is as uniform as possible over the entire
field of view.
4) Carefully focus on the specimen (using eyeglasses, if you wear them).
5) Take pictures when ready.
6) Confirm that, under the exposure conditions used, the brightest nuclei
do not contain saturated pixels. If necessary, take a second picture with
reduced exposure time to avoid saturation.
For Calcofluor fluorescence microscopy of cells
1) Change to the UV filter.
2) Switch the camera exposure settings to those appropriate for Calcofluor
fluorescence.
3) Take a picture of the same field photographed with bright field and
Sytox Green fluorescence in the steps above. Use exposure conditions that
yield a clear image. Signal saturation is not an issue.
Image Processing
Obtaining NIH Image software
NIH Image is public domain software, available for free
over the Internet (http://rsb.info.nih.gov/nih-image/). It was generously
written by Wayne Rasband of the Research Services Branch (RSB) of the National
Institute of Mental Health (NIMH), part of the National Institutes of Health
(NIH). The original NIH Image program was developed to run on Macintosh
computers, but there is now a free PC version (Scion Image for Windows)
available from the Scion Corporation (http://www.scioncorp.com/). In fact,
the Scion Corporation also provides a free enhanced version of NIH Image
for the Macintosh, which is called Scion Image for MacOS. In addition,
Wayne Rasband is also developing a Java version of NIH Image (called
Image/J) that will run on any platform.
We have used our macros extensively only with the current version of
NIH Image (version 1.62). One of us (MP) has successfully tested
some of the macros with Scion Image for Windows. Please let us know
if you are successful or not when trying these macros with other versions
of NIH Image.
When downloading NIH Image or similar programs, be sure to also
download the documentation. Then read the documentation. The instructions
we have provided below assume that the reader has a basic understanding--obtained
by reading the documentation--of how NIH Image works.
Setting Up NIH Image
Before attempting to use NIH Image for quantitative microscopy,
confirm that the following parameters have been set correctly. These parameters
need to be set only once; they are remembered between sessions:
- Memory allocated to NIH Image (see Get Info window) should be
at least 20 Mb (>25 Mb preferred).
- The Undo and Clipboard buffer (Options>Preferences...) should be
set to at least 3 Mb.
- MaxMeasurements (Analyze>Options...) should be at least 3000.
Due to a program peculiarity, each time NIH Image is started up,
it's necessary to reset Page Setup. Under Page Setup, choose Landscape (horizontal)
orientation, and choose maximum print area size (usually "US Letter"
rather than "US Letter Small").
Dealing with problems
The macro for converting color images to grayscale images seems to interact
with the NIH Image software in such a way as to encourage occasional
display of the following dialog box: "24 to 8-bit color conversion
requires a three slice (red, green and blue) stack as input." Appearance
of this dialog does not mean that anything is wrong. Simply click on "OK"
to make the dialog disappear and proceed with your measurements/calculations.
In case of problems when running macros, it is useful to know that any
macro procedure can be stopped by typing command-period.
Image processing details
1) If your images are not already in TIFF format, convert them to TIFF
(uncompressed) format, which is the format used by NIH Image.
2) Open NIH Image.
3) Under the Special menu, select Load Macros... (Special>Load Macros...).
In the resulting dialog box, find the macro file entitled "Nuclear
fluorescence macros." After this macro file has loaded, the choices
in the Special menu will expand to include the names of the individual macros
within the "Nuclear fluorescence macros" file. These names are:
- Extract grayscale slice
- Check nuclear and cell superposition--Calcofluor
- Check nuclear and cell superposition--Bright field
- Prepare and print Calcofluor image
- Nuclear fluorescence to thresholded image
- Thresholded image to initially measured nuclei
- Initially measured nuclei to final measured nuclei
- Generate cell image for thresholding--Calcofluor
- Generate cell image for thresholding--Bright field
- Thresholded cell image to measured cells
- Separation
Converting color files to grayscale
files (Extract grayscale slice)
4) If your images are RGB color images (3-color TIFF files), proceed
with the next steps to convert them to grayscale images. If your images
are already in grayscale mode, then jump to step 11.
5) Under the Special menu, select Extract Grayscale Slice (Special>Extract
Grayscale Slice).
6) A dialog box will appear prompting you to open a 3-color TIFF file.
Click OK to make the dialog box go away.
7) A standard "Open File" dialog box will appear. Use it to
locate and open the 3-color TIFF file you wish to convert to grayscale.
8) Another dialog box will appear asking you to specify whether you want
to extract the red, green or blue information as a grayscale image. This
will depend on how you have set up your camera. In our case, bright field
cell information is in the red channel of the bright field cell pictures,
and Sytox Green and Calcofluor signals are in the green channels of their
images. Determine which channel should be extracted in your case, and then
enter 1 for red, 2 for green (the default value), or 3 for blue, then click
OK.
9) The specified grayscale image will be produced, and another dialog
box will prompt you to save this image. Give it a unique, memorable name
and save it in a convenient location. Note: the uncompressed 3-color TIFF
files generated by our CCD camera are large (3.9 Mb). The corresponding
grayscale files are 1/3 the size--1.3 Mb.
10) Follow steps 4-9 to convert all your 3-color TIFF files to grayscale
files.
Confirm that nuclei and cells are properly
aligned in corresponding images (Check nuclear and cell superposition)
11) Before proceeding further, it is worthwhile to confirm that the cells
(in the bright field image taken through the Sytox Green filter) and the
nuclei (fluorescence image taken with the same filter) are superimposable
on each other. This is not a trivial problem, because the cells are not
embedded or firmly fastened to a substrate. Occasionally some or all of
them may move between the time the bright field picture is taken and the
time the nuclear fluorescence picture is taken. If the cells move during
this time, the images of the nuclei and cells will not be superimposable.
If they are not, the Separation macro won't work. In most cases, it would
be best to take a new set of pictures.
12) Start the appropriate macro for checking superposition of the cell
and nuclear images. Use the bright field macro (Special> Check nuclear
and cell superposition--bright field) if your microscope and camera, like
ours, routinely misalign the Calcofluor and Sytox Green images. However,
if you can routinely obtain precise alignment of the Calcofluor and Sytox
Green images, then you may wish to use the macro for Calcofluor (Special>Check
nuclear and cell superposition--Calcofluor), because Calcofluor-stained
cells are easier to discriminate by thresholding than are unstained, bright-field-visualized
cells (step 46).
13) Follow the prompts.
14) Images will flash onto the screen and then be replaced by new images
as processing proceeds.
15) Finally, an indexed color image will appear, with cells colored green
and nuclei colored magenta--making it easy to check that all the nuclear
images are inside cell images. The Separation macro will work even if the
nuclei are at one side or the other of the cells, so long as the centers
of the nuclei are inside the cell boundaries. The Separation macro will
fail to work in cases where nuclei are mostly or entirely outside of cells.
If you wish, you may save and/or print this image, but it will be necessary
to do so with standard manual commands. The "Check nuclear and cell
superposition" macro does not prompt the user to save or print. It
would be a good idea to close any open windows after you have completed
this step, because none of the windows open at this time will be needed
for later analysis.
Prepare a reference picture of the cells
(Prepare and print Calcofluor image)
16) For one's records and as a reference in case of difficulties in distinguishing
cells or nuclei, it is useful to print a picture of a Calcofluor image.
Because some Sytox Green fluorescence is also detected under the conditions
used to photograph Calcofluor, the Calcofluor image provides information
about nuclear locations as well as about cell boundaries and the presence
or absence of septa.
17) After starting this macro (Special>Prepare and print Calcofluor
image), a dialog box appears with the text, "Cancel + Page Setup OR
OK." There are two clickable buttons: "Cancel" and "OK."
There is also a field in which a number can be entered. This number field
can be ignored; it's an integral part of some NIH Image dialog boxes,
but sometimes (as in this case) it serves no useful purpose. The point of
this dialog box is to remind the user to set Page Setup for optimal printing
of images. In most cases, this means full Letter size, horizontal format.
If Page Setup has not previously been properly set within this session of
NIH Image, then the user should click on "Cancel," then
go to Page Setup, make the proper entries, then return to this macro and
click on "OK." If Page Setup is already properly adjusted, then
the user can immediately click on "OK."
18) Follow the prompts to open the relevant file with the Calcofluor
image of the cells.
19) The macro inverts the image (so the cells appear dark against a light
background) and prepares it for printing. After the user clicks "OK"
in the final dialog box, the inverted image is printed.
Distinguishing nuclei from background
(Nuclear fluorescence to thresholded image)
20) After starting this macro (Special>Nuclear fluorescence to thresholded
image), a dialog box prompts the user to open the grayscale TIFF file containing
the nuclear fluorescence data. This is the file with the Sytox Green image.
21) The program inverts the image (so the nuclei appear dark against
a light background). This inversion is necessary for the thresholding and
particle counting routines of NIH Image to work properly in the next
steps.
22) Dialog boxes offer the user the opportunity to save and/or print
the inverted image. Enter a "1" in the appropriate box to save
or print. Otherwise leave a "0." In both cases, click "OK."
If one clicks "Cancel" at this point, one terminates the macro
and has to start over again.
23) Next, a dialog box offers the prompt, "Set Threshold (Options
menu, LUT tool); Define ROI." Click "OK."
24) At this point, input from the user is required. Go to the Options
menu and select "Threshold." The picture will change from a grayscale
picture to a true black and white picture (all pixels either black or white).
Whether a given pixel is black or white is determined by whether the pixel
signal value is greater or less than the current "threshold" value.
The current threshold value is visible in the Info window and is displayed
graphically in the LUT (look-up table) window (usually at the far left of
the screen). The LUT tool (a double-headed vertical arrow with thick horizontal
cross line at its mid-section) is activated when the mouse pointer is in
the LUT window. Using the LUT tool, which is controlled by the mouse, it
is possible to drag the threshold value (represented by the boundary between
the black and white bars in the LUT window) up or down and see the effect
on the image. When the threshold is 0 (black bar in the LUT window all the
way to the top; no white bar remaining), all pixels in the image will be
black (try it). When the threshold is 255 (white bar in the LUT window all
the way to the bottom; no black bar remaining), all the pixels will be white
(try this, too). In between, it is possible to find a range of threshold
values in which the nuclei appear as black spots on a white background.
25) Before settling on a final threshold value for the nuclei, it is
first important to take advantage of the thresholding function to identify
a Region Of Interest (ROI) for later calculations in which the fluorescence
illumination intensity is relatively uniform. This can be done by
setting the threshold at a low value (frequently as low as 1, 2 or 3) so
that many of the background pixels are above threshold. By comparing
the image at low threshold values when variable numbers of background pixels
are above threshold, it is possible to determine if there are regions of
the image with higher background levels than others. The areas with higher
background correspond to areas in which the fluorescence illumination intensity
was higher (due to inhomogeneity and non-ideality of the light source and
of the optics that bring the illumination to the specimen). Frequently,
there is a central approximately circular area of higher intensity surrounded
by concentric circles of lower intensity. Usually the central circular area
of higher intensity is rather large and is sufficiently uniform to provide
good data. It is now necessary for the user to delimit that area using one
of the ROI tools (see next step). Note: in some cases the entire
field of view may have satisfactorily uniform illumination. In such cases,
the entire field of view is assumed by NIH Image to be the ROI, and
it's not necessary for the user to select an ROI. In such cases, the user
can skip to step 29. The program will automatically use the entire field
of view as the ROI (also known as the "Uniformly Illuminated Region"
[step 31]).
26) Before you proceed, it's important to make sure that you can see
the complete picture taken by the CCD camera. If your computer monitor isn't
sufficiently large to see the entire picture at one time, then click in
the "expand" box (in the title bar, in the upper right corner
of the Sytox Green image). The picture will be compressed so that all of
it will fit into the area available on your monitor screen.
27) In the Tools window (usually adjacent to the LUT window near the
left edge of the screen), find the polygon ROI tool ( third from the top
in the right-hand column; it has the shape of an irregular polygon with
a dashed outline). Use this tool to click anywhere on the boundary of what
you consider to be the central, uniformly illuminated zone. Note: you may
have to set the threshold to a very low value, perhaps 1, 2 or 3, to be
able to estimate where the boundaries of this zone should lie. See the accompanying
illustrations for an example. Continue clicking at additional points around
the boundary. As you click, NIH Image draws a line connecting the
positions of your mouse clicks. Continue until you have totally enclosed
the central, uniformly illuminated zone. Your last mouse click should be
on the position of your first mouse click. When you click on the position
of your first mouse click, NIH Image assumes that you have finished
drawing and it converts the line you have drawn into a thicker line with
moving black and white patches.
28) A this point it is necessary to reactivate the LUT tool. Find the
LUT tool in the Tools window (it's the sixth from the top in the right-hand
column) and click on it. The moving outline around the ROI (from the previous
step) will disappear. That's not a problem. The program remembers the location
of the ROI and will use it later.
29) With the LUT tool active, go to the LUT window and drag the black/white
boundary down or up until (within the ROI at least; you'll have to remember
where the ROI's boundaries are) each nucleus is represented by a single
spot of black pixels, no nuclei are fused, and no nuclei are missing. Usually
this can be accomplished within a broad range of threshold values, but sometimes
the acceptable threshold range is small, and the adjustment of threshold
value has to be carefully done. At this point the picture of the Calcofluor
image can be useful in helping to distinguish between nuclei and background
signals. Once a satisfactory threshold has been reached and all nuclei are
resolved, it is time to proceed to the next macro.
Automatic numbering of nuclei (Thresholded
image to initially measured nuclei)
30) With the thresholded image from the previous step still visible on
your monitor screen, select the next macro (Special>Thresholded image
to initially measured nuclei).
31) A dialog box will appear asking where to save the specifications
for the ROI you constructed in step 27. Unless you understand the implications
for the subsequent function of the image processing macros, do not make
any changes to any of the options in this dialog box. Simply click "Save."
If you should be asked if you wish to replace a previous copy of "Uniformly
Illuminated Region," answer "OK."
32) The black nuclei will now change to pale gray, and those within the
ROI (from step 27) will be numbered (in order from top to bottom, left to
right).
33) Dialog boxes will now offer the option to save and/or print the image
with numbered nuclei. Having a printed or saved copy of this image can be
useful later for full understanding of your final results. We recommend
making copies--at least until these types of analyses have become routine
for you.
34) A table of results will now appear, and so will a dialog box offering
the option of printing the table. Enter a "1" (or leave a "0")
in the dialog box, then click "OK." The results table will have
5 columns. The first (unlabeled) contains the identification numbers of
the measured nuclei (step 32). The remaining columns, labeled Area,
Mean, X and Y, contain information about each nucleus.
Area shows the area (in square pixels) of the nuclear pixels above
threshold value (the area of the black spot in step 29). Mean shows
the mean signal intensity (on a per pixel basis) from these pixels. X
and Y give the X and Y coordinates of the center of the nucleus (in
units of pixels from the origin at the upper left corner of the image).
Unfortunately, the only numbers from this table which are useful for further
analysis are the X and Y values. The area and mean are not useful, because
they are based on the arbitrary setting of the threshold value employed
in step 29. This problem is corrected by the next macro.
Fluorescence signal data from nuclei
of uniform size (Initially measured nuclei to final measured nuclei)
35) Select the next macro (Special>Initially measured nuclei to final
measured nuclei). This macro sets each nucleus to a circle of 80 square
pixels, centered on the X and Y values from the previous step. The mean
signal intensity within each nuclear circle is then determined. The resulting
signal values can then be compared with each other, because the same number
of pixels was analyzed for each nucleus, and the number of pixels is not
dependent on the threshold value.
36) Due to the extra calculations involved, this macro works noticeably
more slowly than the previous one. As it is working, the nuclei are temporarily
renumbered. The temporary numbers appear on the picture of the nuclei. However,
the final results table restores correct numbering. Notice, in the final
results table, that each nucleus now has an area of 80 square pixels.
37) A dialog box offers you the option to print the results table at
this point. We do not recommend printing the results table, because NIH
Image has a 32K limit on the number of results it can display, print
or copy, and it is possible that you may have sufficient measurements to
exceed that limit. Instead, if you wish you may manually save the results
to a text file which can later be opened by a program that does not have
a 32K limit. See step 62.
38) If you simply want to determine the distribution of DNA content in
the entire population of nuclei that you have analyzed, then you can stop
here. The results are contained in the Mean column of the results
table produced in step 36. After saving the file, those results can be extracted
and analyzed by a number crunching/spreadsheet/graphing program.
39) But if you want to distinguish between the fluorescence of nuclei
in binucleate cells and the fluorescence of nuclei in uninucleate cells,
then it is necessary to proceed to the next macros, which will first locate
(and determine the position and angle of) all the cells in the field of
view and then determine which nuclei are in uninucleate cells and which
are in binucleate cells. Leave the nuclear images and results table on screen
as you proceed to the next macro.
Identifying cells (Generate cell image
for thresholding--Bright field)
40) We have written three macros for preparing cell images for thresholding,
two for cells visualized by bright field microscopy and the other for cells
visualized by Calcofluor fluorescence. Readers whose microscopes and epifluorescence
filter sets permit taking pictures of Calcofluor-stained cells and Sytox-Green-stained
nuclei that are perfectly in register with each other may wish to use the
Calcofluor macro at this point. Because our microscope does not have this
capability, we use one or the other of the bright field macros.
41) In cases where the field of view is large and bright field illumination
intensity varies across the field of view, we recommend the macro with background
subtraction (Special>Generate cell image for thresholding--bright field--background
subtract). When bright field illumination intensity is uniform across the
field of view (usually the case when the field of view is small), we recommend
the macro without background subtraction (Special>Generate cell image
for thresholding --bright field). If you experience difficulty in satisfactorily
identifying all your cells by thresholding, we recommend trying the other
macro (the one you didn't try at first).
42) A dialog box will prompt you to find and open the TIFF image with
information about cells. Note: this image must be the bright field cell
image that corresponds to the image of nuclei processed in steps 20-37.
43) After the image is opened, the macro with background subtraction
will perform some image processing to make the background more uniform.
44) Then a dialog box will ask you to "Set threshold (options menu);
vary with LUT tool." Click "OK."
45) Make sure that the entire image is visible on screen. As in step
26, click the "expand" box in the title bar in the upper right
corner of the image window.
46) Use the LUT tool as in steps 24 and 29 above to choose a threshold
value that creates a solid mass of black pixels over all the cells but does
not generate more than a few isolated black pixels anywhere in the background.
Closely spaced cells should be resolved from each other. No cell should
contain more than a few, primarily non-adjacent white pixels. In cases of
difficulty, the threshold should be set so that all of the cells within
the ROI (see steps 25, 27 and 31) are resolved. The cells outside the ROI
can be ignored, because cells that are not properly resolved outside the
ROI will not affect the rest of the analysis. The reference Calcofluor image
(steps 16-19) can be useful at this point to help determine whether cells
that appear to touch at their ends by bright field microscopy represent
a single septated cell or two independent cells that by coincidence are
adjacent to each other.
47) After a satisfactory threshold value has been selected, proceed to
the next macro.
Cell statistics (Thresholded cell
image to measured cells)
48) With the previous image still on screen, load the "Thresholded
cell image to measured cells" macro (Special>Thresholded cell image
to measured cells).
49) A dialog box prompts one to find and open the "Uniformly illuminated
region" corresponding to the ROI generated and saved in steps 25, 27
and 31.
50) The macro instructs NIH Image to number the cells within the
ROI. Cells that touch the edge of the ROI will not be numbered.
51) Dialog boxes offer opportunities to print and/or save the image with
numbered cells.
52) A results window appears with information about the cells in the
ROI. At the same time, a dialog box appears recommending that you "Make
Results window small before starting Separation macro." Click "OK"
to make this dialog box disappear, but remember its suggestion, which should
be implemented at step 54.
53) Now that the dialog box "Make Results window small..."
has disappeared, one can see the Results window. This window now contains
more columns than before. If necessary, you should manually widen the window
so that you can see all of its columns. Positions 1 through n in
the table (where n is the number of nuclei) contain the previously
obtained final nuclear measurements. Positions n+1 to n+c
(where c is the number of cells) contain information about the cells
in the ROI. The measurements were done on the thresholded image from step
47. The Area column contains the cell area in square pixels. The
Mean value is 255 for each cell, since all the measured pixels in
the thresholded image were black. X and Y display the X and
Y values of the center of the ellipse whose shape best approximates the
shape of the cell. The Length column does not show cell length; rather
it shows the perimeter of the cell (in pixel units). Major, Minor
and Angle show the major and minor axes and the angle (counterclockwise
from horizontal) of the ellipse that best approximates the shape of the
cell. The position and ellipse measurements will be employed by the next
macro, which separates uninucleate from binucleate cells. If there are data
in this results table that you may want to use later on, it's a good idea
to save it at this point, using the Export... command described in step
62, because some of the data in this table will be lost during the operation
of the next macro (Separation).
54) It is helpful at this point to resize the Results window by dragging
its resizing box (lower right corner of window) until just a small white
patch from the upper right corner of the Results window is showing, and
no text is showing. The purpose of this resizing is to prevent the computer
from attempting to redraw the Results window after every calculation in
the next macro. By suppressing the computer's attempt to redraw the Results
window after every calculation, the pace of the calculations can be speeded
up by about 10%.
Distinguishing uninucleate and binucleate
cells (Separation)
55) With the small Results window from the previous step still visible
on your monitor screen, select the next macro (Special>Separation).
56) A dialog box will appear asking you to specify the average half-width
of the cells. The default value is 3.5 pixels, which is satisfactory for
normal S. pombe cells (under our microscopic and camera conditions,
with a 20X objective lens). The correct value under other conditions can
be estimated from the average minor axis size from the cell measurements
(step 53) or by direct measurement. After the correct value is introduced
into the small window in the dialog box, click "OK."
57) Another dialog box appears to inform you of the number of nuclei
and cells to be analyzed. Click "OK."
58) The macro will now examine each cell, in numerical order, and test
whether any nuclei fall inside that cell. The basic test is: does the center
of the nucleus fall within a rectangle whose center is the same as that
of the cell, whose width is that of the cell, whose length is defined by
the major axis of the best-fit ellipse (step 53) and whose angle from the
horizontal is defined by the angle of the ellipse?
59) One can follow the progress of the results in the Info window, where
3 numbers are displayed. These numbers show, for the cells measured so far,
the number of uninucleate cells (first number), the number of binucleate
cells (second number), and the number of "strange" cells (third
number). A cell is defined as "strange" if it does not contain
a nucleus or if it contains more than one nucleus. If one's microscopy,
photography and analysis conditions are correct, then the number of strange
cells should be 0 for normal, exponentially growing S. pombe cells.
However, if one is dealing with a population demonstrating a "cut"
phenotype, then the proportion of strange cells might be high. Note that
this analysis offers an excellent means of quantitating the extent of the
"cut" phenotype.
60) After the analysis is complete (as indicated by the fact that the
number of analyzed cells in the Info window stops increasing), one should
manually expand the results table. Notice that this time it has even more
columns: Area, Mean, S.D., X, Y, Length, Major, Angle, Minor, Max, Binucleate
and Strange. Due to peculiarities of the NIH Image program, it
is not possible to assign user-defined names to more than two columns in
a table. However, columns with inappropriate names can be used for any type
of data. In this case, we have used the two permitted user-definitions for
the last two columns (Binucleate and Strange), which show,
respectively, the identification numbers of the binucleate and strange cells.
The adjoining column, Max, shows--despite its title--the identification
numbers of the uninucleate cells. Ordinarily there are many more cells in
the Max column than in the Binucleate column. The columns
misleadingly titled Angle and Min actually show the identification
numbers and corresponding mean signal values of the nuclei located in binucleate
cells. Similarly, the columns with the assigned titles Length and
Major actually show the identification numbers and the mean signal
values of the nuclei in uninucleate cells. In all these cases, the useful
data are in the top portions of the columns, above the zeroes (0.00). In
two cases (Major and Angle), the bottom entries (below the
zeroes) show the major axis and angle of the cells whose additional data
are displayed in columns to the left.
61) The results table also contains much of the data displayed in the
results tables obtained at earlier steps in the analysis (final nuclear
measurements, steps 36-37, and cell measurements, steps 52-53). The only
exceptions are the Area and S.D. columns, whose top few entries
were used for temporary storage during calculations carried out by the Separation
macro. Thus these top few entries are likely to contain unusual numbers
after the calculations have been completed. These numbers can be ignored.
62) At this point it is important to save the results table. In cases
where many nuclei and cells have been analyzed, the total amount of data
in the results table will exceed the 32K display limit of the NIH Image
program. To be certain of obtaining all the relevant data, it is important
to save the results table as a file on one's hard disk. The file can subsequently
be opened in any of a variety of word processors, text editors, and numerical
analysis programs, and the useful data can be extracted. To save the results
table, make sure it is the active window. Then under the File menu, and
with the option key held down, select Export... (File>Export...).
A dialog box will appear allowing you to assign a name and a save location
to the results file. If you do not hold down the option key while selecting
Export..., the resulting file will not contain column headers or indexing
information.
Further data analysis
What one does with the data on nuclear DNA content and cell morphology
generated by the above protocols depends on one's own particular research
needs. We wish to point out, however, that the text files generated by saving
results tables using the export method described in step 62 above can easily
be opened by all standard text editing, word processing, spread sheet and
data graphing programs, so the possibilities for further data analysis are
immense. We find it particularly useful to generate frequency histograms
of the nuclear fluorescence data, either for the entire cell population
or for the separate uninucleate and binucleate subpopulations. We do this
by extracting the data for mean nuclear fluorescence either from the results
table for the entire population (step 38) or from the results table listing
separate data for the uninucleate and binucleate cell populations (step
60). We use Igor Pro (an excellent graphing and number crunching program
for the Macintosh; http://www.wavemetrics.com/) for this purpose, but Microsoft
Excel and other spreadsheet programs should also be able to do the job.
Fluorescence standards and data pooling
The procedures we've described so far are satisfactory for producing
data from a single microscopic field of view. But what if that field of
view contains too few cells for good statistics (i.e. such a small number
of cells that a great deal of scatter is evident when the data are plotted)?
We have found that it is possible to combine the data from multiple fields
of view in order to achieve better statistics, provided that all data are
normalized to the same standard (because mean fluorescence intensity may
vary from field to field). In the case of log phase cell populations, the
2N peak, which is always sharp and clear, provides a good standard. However,
if one were studying a cell population of uncertain DNA content, such as
a population synchronously passsing through S phase, then one would probably
have to split each experimental sample into two, add a fluorescence standard
(such as a similar number of homogeneous 2N cells) to one of the two samples,
and measure the distribution of fluorescence in both cases (with and without
standard). The signals from the sample with standard could be normalized
to the standard. This would permit determination of the average signal from
the experimental population relative to the standard. The sample without
standard could then be measured and normalized to the average population
signal determined in the sample with standard. The absence of standard in
the latter case would permit one to see the full distribution of fluorescence
signals within the experimental population without worry that some of those
signals might be obscured by the standard.
Text of the macros for image processing
Macros for NIH Image are text files written in the Pascal programming
language, with modifications as described in the documentation for NIH
Image. The Pascal language is simple and easy to learn. None of us had
prior training before we started this project. We encourage you to read
the relevant NIH Image documentation and to learn from our macros
(and others at the NIH Image web site) so that you can modify these
macros to suit your own needs.
The following text can be copied and pasted from an electronic version
of this document (which we'll be glad to send you) or from the Huberman
web site into a new macro file for NIH Image named "Nuclear
fluorescence macros" (actually, you can name it anything you want,
but if you use the suggested name then you won't get confused when our instructions
(above) refer to a macro file named "Nuclear fluorescence macros").
Note that expressions in braces {} are comments and are not read by the
program. Also note that all Pascal commands are terminated by a semicolon
(;).
{Nuclear fluorescence macros}
{Marius Poitelea, Amy Piwowar and Joel Huberman, July 1999}


var {Global Variables}
a, nuc, cells, Choice, Unicount, Bicount, Strangecount, NucId1, NucId2, CellId1:Integer;

{ 0 ************************************************}

macro 'Extract grayscale slice';
var
Color:Integer
begin
PutMessage('Open a 3-color TIFF file');
Import('Choose Image'); {generic string here calls Import dialog box}
Color:=GetNumber('1 for red, 2 for green, 3 for blue',2,0);
SelectSlice(Color);
Duplicate('Extracted Image');
SetSaveAs('TIFF');
SaveAs('Extracted Image');
Dispose;
Dispose;
End;

{ 1 ************************************************}
macro '(-'; {creates dividing line in Special menu}


macro 'Check nuclear and cell superposition--Calcofluor';
var
Width,Height,CellId,NucId,SuperId:Integer
begin
SetImport('TIFF');
PutMessage('Open the TIFF file with cell images');
Import('Choose Image'); {generic string calls Import dialog box}
CellId:=PidNumber;
PutMessage('Open the TIFF file with nuclear fluorescence data');
Import('Choose Image'); {generic string here calls Import dialog box}
NucId:=PidNumber;
EnhanceContrast;
ApplyLUT;
SelectAll;
Copy;
GetPicSize(Width,Height);
SetNewSize(Width,Height);
MakeNewStack('Superposition');
SuperId:=PidNumber;
Paste; {Pastes nuclear image into the red slice of "Superposition"}
SelectPic(CellId); {Activates cell image}
SelectAll;
Copy;
SelectPic(SuperId); {Activates "Superposition"}
AddSlice;
Paste;
SelectPic(NucId); {Activates nuclear image}
SelectAll;
Copy;
SelectPic(SuperId); {Activates "Superposition"}
AddSlice;
Paste;
RGBtoIndexed('Custom LUT');
end;


macro 'Check nuclear and cell superposition--Brightfield';
var
Width,Height,CellId,NucId,SuperId:Integer
begin
SetImport('TIFF');
PutMessage('Open the TIFF file with cell images');
Import('Choose Image'); {generic string calls Import dialog box}
CellId:=PidNumber;
Invert;
EnhanceContrast;
ApplyLUT;
PutMessage('Open the TIFF file with nuclear fluorescence data');
Import('Choose Image'); {generic string here calls Import dialog box}
NucId:=PidNumber;
EnhanceContrast;
ApplyLUT;
SelectAll;
Copy;
GetPicSize(Width,Height);
SetNewSize(Width,Height);
MakeNewStack('Superposition');
SuperId:=PidNumber;
Paste; {Pastes nuclear image into the red slice of "Superposition"}
SelectPic(CellId); {Activates cell image}
SelectAll;
Copy;
SelectPic(SuperId); {Activates "Superposition"}
AddSlice;
Paste;
SelectPic(NucId); {Activates nuclear image}
SelectAll;
Copy;
SelectPic(SuperId); {Activates "Superposition"}
AddSlice;
Paste;
RGBtoIndexed('Custom LUT');
end;

macro 'Prepare and print calcofluor image';
Begin
Choice:=GetNumber('Cancel + PageSetup OR OK',0,0);
PutMessage('Open the grayscale TIFF file with calcofluor data');
Import('');
Invert;
Print;
PutMessage('Now printing');
Dispose;
End;

{ 2 ************************************************}
macro '(-'; {creates dividing line in Special menu}


macro 'Nuclear Fluorescence to Thresholded Image';
var
Choice,NucId1: integer;
begin
SetImport('TIFF');
PutMessage('Open the grayscale TIFF file with fluorescence data');
Import(''); {empty string here calls Import dialog box}
Invert; {makes dark nuclei on a white background}
NucId1:=PidNumber;
Duplicate('Fluorescence Grayscale'); {makes a copy--original remains underneath}
NucId2:=PidNumber;
SetSaveAs('TIFF'); {forces saving as TIFF file}
Choice:=GetNumber('Type a 1 here to save this image',0,0);
if Choice>0 then SaveAs('Fluorescence Grayscale');
Choice:=GetNumber('Type a 1 here to print this image',0,0);
If Choice>0 then Print;
PutMessage('Set Threshold (Options menu, LUT tool); Define ROI');
end;

{************************************************}
macro 'Thresholded Image to Initially Measured Nuclei';
begin
NucId1:=(NucId2+1); {It's necessary to redefine NucId1 here, because NucId1, but not NucId2, is forgotten between the preceding macro and this one}
SelectPic(NucId1);
RestoreROI; {This passes the ROI boundaries that were established manually between this macro and the preceding one on to the original image of nuclear fluorescence}
SetSaveAs('Outline');
SaveAs('Uniformly Illuminated Region');
SelectPic(NucId2); {Activates the Fluorescence Grayscale image with thresholded nuclei}
RestoreROI; {Ensures that manually determined ROI is selected}
InvertY(false); {Ensures that Y coordinates run from top to bottom of window}
SetScale(0,'pixel'); {disables any previous scale calibration}
SetScale(1,'pixel'); {makes 1 pixel = 1 pixel}
SetParticleSize(3,85); {sets lower and upper limits to nuclear size}
SetOptions('Area,Mean,X-Y Center');
AnalyzeParticles('label,ignore,include,reset'); {measure nuclei, labeling each nucleus with a number, ignoring nuclei touching the edge of the picture, including interior holes, and resetting the measurement counter}
SetSaveAs('TIFF'); {forces saving as TIFF file}
Choice:=GetNumber('Type a 1 here to save this image',0,0);
if Choice>0 then SaveAs('Measured Nuclei');
Choice:=GetNumber('Type a 1 here to print this image',0,0);
If Choice>0 then Print;
Dispose;
ShowResults;
Choice:=GetNumber('Type a 1 here to print these results',0,0);
If Choice>0 then Print;
nuc:=rCount; {Gets the number of nuclei}}
end;


{************************************************}
macro 'Initially Measured Nuclei to Final Measured Nuclei';

var
width, height: integer

BEGIN
InvertY(false);
SelectPic(NucId1);
SetScale(0,'pixel'); {disables any previous scale calibration}
SetScale(1,'pixel'); {makes 1 pixel = 1 pixel}
GetPicSize(width,height);
SetOptions('Area,Mean,X-Y Center');
For a:=1 to nuc DO
BEGIN
If rX[a]<5 then rX[a]:=5; {This and the next 3 correct for nuclei close to edge}
If rX[a]>(width-5) then rX[a]:=(width-5);
If rY[a]<5 then rY[a]:=5;
If rY[a]>(height-5) then rY[a]:=(height-5);
MakeOvalRoi((rX[a]-5),(rY[a]-5),10,10); {Circular ROI of radius 5 pixels centered on each nuclear position}
Measure; {Gets area, mean and X,Y position for circle of 80 square pixels at each nuclear position}
MarkSelection;
END;
For a:=(nuc+1) to (2*nuc) DO
BEGIN {This loop substitutes correct area information for each nucleus (80 square pixels) for the incorrect area obtained from thresholding and particle analysis.}
rArea[a-nuc]:=rArea[a];
END;
For a:=(nuc+1) to (2*nuc) DO
BEGIN {This loop substitutes correct mean information for each nucleus for the incorrect mean obtained from thresholding and particle analysis.}
rMean[(a-nuc)]:=rMean[a];
END;
SetCounter(nuc); {Resets the counter to "nuc", thus erasing all of the primary measurements obtained with circular ROIs. However, copies of the critical measurements (area and mean) were transferred by the preceding loops to the portions of the area and mean arrays that are preserved after the SetCounter comomand (measurements 1 to nuc)}
ShowResults;
Close;
ShowResults;
Choice:=GetNumber('Type a 1 here to print these results',0,0);
If Choice>0 then Print;
END;


{ 3 *********************************************}
macro '(-'; {creates dividing line in Special menu}


macro 'Generate cell image for thresholding--Calcofluor';
begin
SetImport('TIFF');
PutMessage('Open the grayscale TIFF file with cell data');
Import(''); {empty string here calls Import dialog box)}
Invert;
CellId1:=PidNumber;
PutMessage('Set Threshold (Options menu); Vary with LUT tool');
end;

macro 'Generate cell image for thresholding--Brightfield--background subtract';
begin
SetImport('TIFF');
PutMessage('Open the TIFF file with cell data');
Import(''); {empty string here calls Import dialog box)}
SubtractBackground('2D Rolling Ball',10);
CellId1:=PidNumber;
PutMessage('Set Threshold (Options menu); Vary with LUT tool');
end;

macro 'Generate cell image for thresholding--Brightfield';
begin
SetImport('TIFF');
PutMessage('Open the TIFF file with cell data');
Import(''); {empty string here calls Import dialog box)}
CellId1:=PidNumber;
PutMessage('Set Threshold (Options menu); Vary with LUT tool');
end;

macro 'Thresholded cell image to measured cells';
var
Choice:integer;
begin
SelectPic(CellId1);
PutMessage('Find and open "Uniformly Illuminated Region"');
Open('Uniformly Illuminated Region');
MakeBinary;
Erode; {helps to separate touching cells}
SetScale(0,'pixel'); {disables any previous scale calibration}
SetScale(1,'pixel'); {makes 1 pixel = 1 pixel}
SetParticleSize(20,500);
SetOptions(' X-Y Center, Major, Minor, Angle, Area, Mean, Length, User1, User2');
AnalyzeParticles('label,ignore,include'); {The measurement counter is NOT reset. Thus these cell measurements are appended to the nuclear measurements already in the Results window}

Choice:=GetNumber('Type a 1 here to save this image',0,0);
if Choice>0 then SaveAs('Measured Cells');
Choice:=GetNumber('Type a 1 here to print this image',0,0);
If Choice>0 then Print;
{ShowResults;}

cells:=rCount-nuc; {calculation of number of cells}

{Because of the bug in NIH Image which brings numerous other arrays into the final Results window when one asks only for Minor, the following commands in this macro move the data from Minor to rUser1, relabel ruser1 as Minor and display ruser1 instead of the genuine Minor}

For a:=1 to cells DO rUser1[nuc+a]:=rMinor[nuc+a];
SetUser1Label('Minor ');

Showmessage ('You have ', cells, ' cells and ', nuc, ' nuclei.'); {Will show in the info window how many cells and how many nuclei were counted}
Wait(1);

Dispose; {these commands get rid of the image windows, which are no longer necessary}
Dispose;

FOR a:=1 to nuc DO BEGIN
rLength[a]:=0; {This should reset rLength to 0 within the nuclear range of the final Measurements table; the following commands are similar}
rMajor[a]:=0;
rMinor[a]:=0;
rAngle[a]:=0;
rMin[a]:=0;
rMax[a]:=0;
rUser1[a]:=0;
rUser2[a]:=0;
END;

SetOptions('X-Y Center, Major, Angle, Area, Mean, Length, rUser1');
ShowResults; {This will show the results of both the nuclear measurements (first) and cell measurements (second)}
PutMessage('Make Results window small before starting Separation macro');
end;


{ 4 *********************************************}
macro '(-'; {creates dividing line in Special menu}


macro'Separation';
var
CellWidth, DeltaX, DeltaY, Slope, PointToLine, AbsDeltaXCorr, AbsDeltaYCorr: REAL
a, b, c, n, m, t, Unicount, Bicount, Strangecount: INTEGER

begin
CellWidth:=GetNumber('Average cell half-width (pixels)',3.5,1);
Unicount:=0;
Bicount:=0;
Strangecount:=0;
SetOptions('Area, Mean, X-Y Center, Min, Max, Length, StdDev, Major, Angle, User1, User2');
FOR a:=1 TO (nuc+cells) DO
BEGIN {"Set arrays not in current use to 0"}
rMin[a]:=0;
rMax[a]:=0;
rLength[a]:=0;
rStdDev[a]:=0;
rUser1[a]:=0;
rUser2[a]:=0;
END; {End "Set arrays not in current use to 0"}
PutMessage('nuc',nuc,' cells',cells);

FOR a:=(nuc+1) TO (nuc+cells) DO
BEGIN {"loop through cells"}
DeltaX:=-cos(rAngle[a]/57.296)*(rMajor[a]/2-abs(sin(rAngle[a]/57.296))*CellWidth); {Minus sign used here, because angles are defined in NIH Image on the assumption of standard Cartesian coordinates, but the default coordinates in NIH Image have an inverted Y axis (origin at upper left rather than lower left)}
DeltaY:=sin(rAngle[a]/57.296)*(rMajor[a]/2-abs(cos(rAngle[a]/57.296))*CellWidth);
Slope:=(sin(rAngle[a]/57.296))/(cos(rAngle[a]/57.296));
AbsDeltaXCorr:=(abs(DeltaX)+abs(sin(rAngle[a]/57.296)*CellWidth));
AbsDeltaYCorr:=(abs(DeltaY)+abs(cos(rAngle[a]/57.296)*CellWidth));
n:=0;
m:=0;
FOR b:=1 TO nuc DO
BEGIN {"loop through nuclei"}
IF (abs(rX[b]-rX[a])<AbsDeltaXCorr) AND (abs(rY[b]-rY[a])<AbsDeltaYCorr) THEN
BEGIN {"nucleus may be in cell"}
n:=n+1;
rStdDev[n]:=b;
END; {end "nucleus may be in cell"}
END; {end "loop through nuclei"}
IF n>0 THEN
BEGIN {"test if nucleus really is in cell"}
FOR c:=1 TO n DO
BEGIN {loop through nuclei near cell}
t:=rStdDev[c];
PointToLine:=abs((Slope*(rX[a]-rX[t])+(rY[a]-rY[t]))/sqrt(sqr(Slope)+1));
IF PointToLine<CellWidth THEN
BEGIN {"nucleus in cell"}
m:=m+1;
rArea[m]:=t;
END; {end "nucleus in cell"}
END; {end "loop through nuclei near cell"}
IF (m=0) OR (m>2) THEN
BEGIN {"no nucleus or too many nuclei=strange cell"}
Strangecount:=Strangecount+1;
rUser2[Strangecount]:=a;
END; {end "no nucleus or too many nuclei=strange cell"}
IF m=1 THEN
BEGIN {"single nucleus in cell"}
Unicount:=Unicount+1;
rMax[Unicount]:=a;
rMajor[Unicount]:=rMean[rArea[1]];
rLength[Unicount]:=rArea[1];
END; {end "single nucleus in cell"}
IF m=2 THEN
BEGIN {"two nuclei in cell"}
Bicount:=Bicount+1;
rUser1[Bicount]:=a;
rMin[2*Bicount-1]:=rMean[rArea[1]];
rMin[2*Bicount]:=rMean[rArea[2]];
rAngle[2*Bicount-1]:=rArea[1];
rAngle[2*Bicount]:=rArea[2];
END; {end "two nuclei in cell};

END; {end "loop through cells"}

ShowMessage(Unicount, Bicount, StrangeCount);
SetUser1Label('Binucleate');
SetUser2Label('Strange');
ShowResults;
END; {end macro}
END;
This page was last modified on October 31, 1999.
Return to top of page
Return to Huberman Lab home page